


Computer-generated pen-and-ink illustration
Jinshan Liu
Department of Computer science
SUNY at stony
brook
[email protected]
ABSTRACT
The project presents a simple non-photorealistic rendering method for creating pen-and-ink illustration style images. The silhouette edges are drawn using a depth buffer and a simple texture mapping is used to create artistic images.
1.INTRODUCTION
Much research in graphics has been devoted to non-photorealistic rendering. The advantages of NPR over photorealistic rendering include simplicity, more expressiveness and economy of expression in representing texture and tones.
The goal of this project is to
implement a way to create a fast and effective pen-and-ink illustration. That
is, finding and drawing the outlines and silhouettes, calculating the
illumination, and creating texture on the surface. Texture mapping is
implemented with OpenGL.
2.SOLUTION
This Program is written in C++, along with OpenGL. Two models are used in this project: Venus model and face model from Raskar’s website [5]. The number of polygons in Venus model is 5,672 and face model is 13,408. It includes three parts: silhouette edges, stroke textures and shading.
Silhouette edges:
The first part of this project is to detect the silhouette edges of the object and draw those edges. The definition of silhouette edges is the boundaries between adjacent front-facing and back-facing polygons. Raskar presented several simple methods to draw the silhouette edges. I adapted the "wireframe method" to draw the silhouette edges of the Venus model and the face model. The idea of wireframe method is rendering the back-facing polygons as wireframe:
The steps are followed:
-Draw background in
white
-Enable back face culling
-Render front-facing polygons in
white
-Enable front face culling, set depth function "Less than or Equal
to"
-Render back-facing polygons as wireframe mode in black
To create hand-drawn appearance, the back-facing
polygons are drawn as glLineStipple. This method generates silhouettes edges
with appropriate quality.
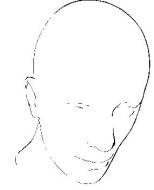
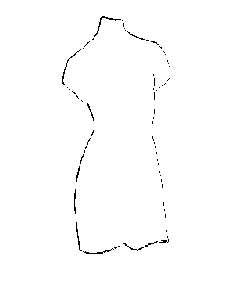
Picture1. Silhouette edges of face model picture2. Sihouette lines of Venus model
Stroke textures:
The second part of this project is to create the pen-and-ink line drawing of the surfaces of the object. Some researchers presented methods of placing the line strokes based on the direction field of the surfaces, such as principle curvature direction fields. However, images produced by this method tend to create over-complex hatching pattern. Hertzmann et al. observed some artistic examples and concluded "artists tend to use relatively straight hatch lines, even when the surface has wrinkles.… hatches curve only slightly, while capturing the overall shape of the surfaces..." Thus, I adapted the method of creating contours on the surfaces of the object in the OpenGL red book and modified it to create the line hatches on the surfaces:
The steps are as following:
-Create 2D line
texture
-Generate texture-coordinate (s and t) automatically (with glTexGen()
of OpenGL)
-Texture mapping while drawing each polygons
Stroke textures are created with different level (level
1-5) for different darkness during the texture mapping.
Two different sets
of textures are generated:
(a)Stipples: The density of stipples is controlled
by the percentage of pixels in the texture sample which are black.


(b)Lines(HatchLines):
Shading:
Line
Texture
Stipple Texture
Level 1 Dark
cross-hatching Most dense
stipple
Level 2
Cross-hatching
Second most dense stipple
Level 3 Dense line
hatching Third most dense
stipple
Level 4
Line-hatching
Fourth most dense stipple
Level 5
Blank
Blank
3.Implementation
Creating the textures is followed to by shade the surfaces according to different value of N·L (dot-product), in which N is the normal of the surface, L is the vector pointing to the light source from the center of the surface.
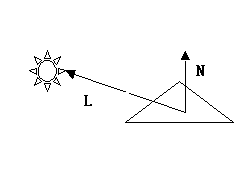
With different values of N·L, I shade accordingly
as followed:
If
(N·L>=0.75)
Mapping with Level
5 texture;
Else if (N·L<=0.75)
&&(N·L>=0.5)
Mapping
with Level 4 texture;
Else if (N·L<=0.5)&&
(N·L >=-0.25)
Mapping with
Level 3 texture;
Else if
(N·L<=0.25)&&(N·L
>=0.1)
Mapping with Level 2
texture;
Else
Mapping
with Level 1 texture.
So the final results are:
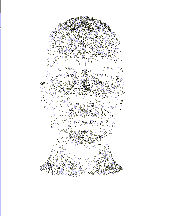
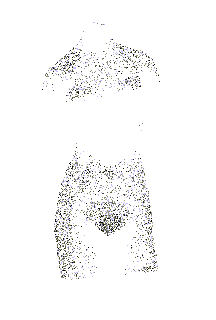
Pic3. Stipple of face Pic 4 Stipple of Venus
User control:
Inheriting from the homework 1-3, I also provide user interfaces for user to
translate, rotate the model, switch the model between Venus and face
model.
4. Conclusions
The pen-and-ink illustration implementation via OpenGL is pretty effective. The silhouette of the model is succinct and amazingly expressive and the mapping (stipple or hatch textured) provide a pretty good expression.
5. Future work
There could be much work extended from this project.
User interface: the program so far only allows the user chooses from the built-in selections. A more interactive user interface is needed so that the user can edit and modify the stroke textures and the shading method.
Stroke texture: there are two stroke textures used in
this project: line-hatching and stipple. A more hand-drawn look can be achieved
by applying noise function to the strokes such as the brick texture in
[1].
6. References
[1] Georges Winkenbach
and David H. Salesin, "Computer-Generated Pen-and-Ink Illustration,"
In SIGGRAPH '94 Conference Proceedings, pp. 91-100, ACM SIGGRAPH, July
1994
[2] Michael P. Salisbury, Michael T. Wong, John F. Hughes, and David H.
Salesin, "Orientable Textures for Image-Based Pen-and-Ink
Illustration," In SIGGRAPH '97 Conference Proceedings, pp. 401-406, August
1997.
[3] Ramesh Raskar and Michael Cohen, "Image Precision Silhouette
Edges", Symposium on Interactive 3D Graphics, Atlanta GA, April
1999
[4] Mason Woo, Jackie Neider, Tom Davis, and Dave Shreiner, "OpenGL
Programming Guide:", Second Edition, 1996
[5] http://www.cs.unc.edu/~raskar/NPR
[6]Adam
Lake, Carl Marshall, Mark Harris, and Marc Blackstein, "Stylized Rendering
Techniques For Scalable Real-Time 3D Animation," Game Developers Conference
2000. http://developer.intel.com/ial/3dsoftware/nonphoto.htm